
Can You Paint Antifoul Over Old Paint? Assess the Hull First

Yes, you can often paint antifoul over old paint if the existing coating is sound, firmly adhered and compatible with the new antifoul. The answer to “can you paint antifoul over old paint” depends less on the coating’s age than on its condition and the preparation required. If it’s peeling, soft or heavily chalked, painting straight over it can leave the new coat poorly bonded.
It’s tempting to think a fresh coat means stripping the hull back first, but well-adhered antifouling doesn’t always need complete removal. This guide shows you how to assess the old coating, spot when loose or deteriorated paint needs attention, and understand when compatibility or a sealer coat matters. You’ll also learn how paint buildup, hull material and the right application method affect the result, so you can make a practical decision before the next antifouling job.
Table of Contents
1. Can You Paint Over Old Boat Antifouling?
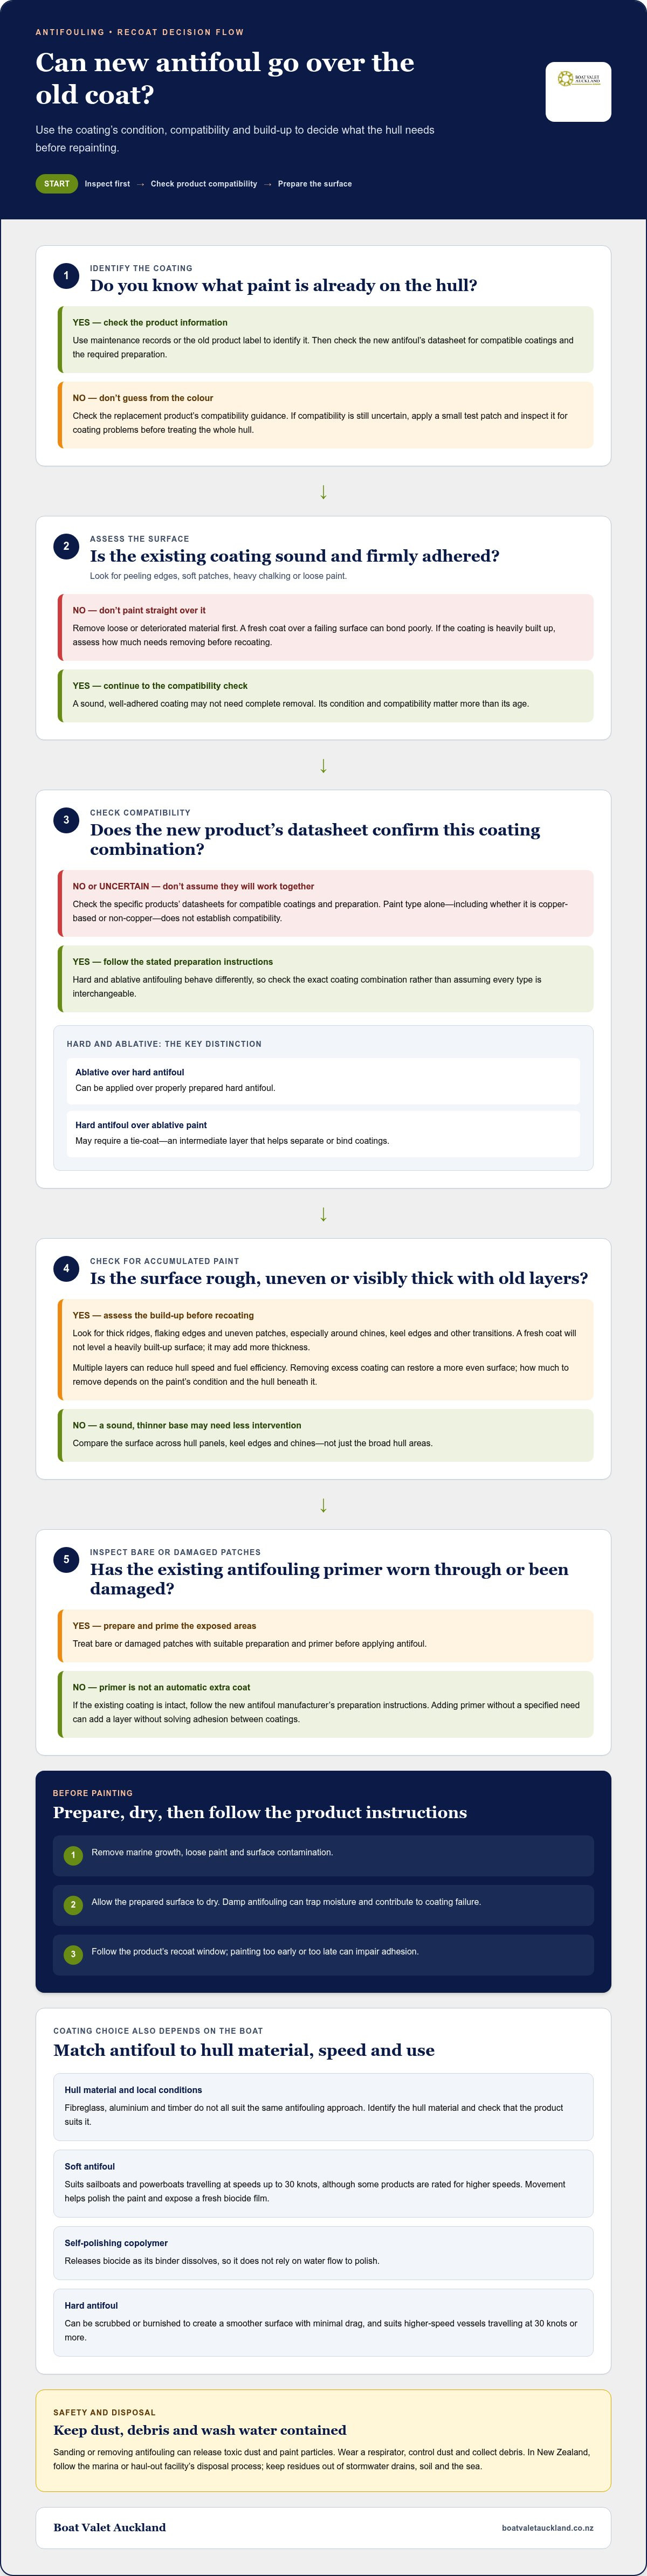
Yes, you can often apply new antifouling over old paint if the existing coating is sound, firmly attached and compatible. So, can you paint antifoul over old paint? First identify the old coating and inspect its condition. Peeling edges, soft patches or heavy chalking can prevent reliable adhesion. Remove loose material, then follow the new paint manufacturer’s preparation and compatibility instructions.
Hard and ablative antifouling behave differently, so don’t assume every combination will work. Ablative paint wears away gradually, while hard antifoul forms a more durable coating. Ablative antifoul can go over properly prepared hard antifoul. Applying hard antifoul over ablative paint may require a tie-coat to prevent a reaction. A tie-coat is an intermediate layer that helps separate or bind coatings.
Copper-based and non-copper paints aren’t automatically interchangeable either. Their binders and active ingredients vary, so paint type alone can’t establish compatibility. Check the manufacturer’s datasheet for the specific existing and replacement products. It should identify compatible coatings and the required surface preparation. If the old paint is unknown, don’t guess from its colour. A small test patch can reveal visible problems before you coat the whole hull.
Use this sequence before repainting:
Identify the old paint from maintenance records or its product label.
Check the new product’s datasheet for compatible antifoul types and preparation.
Remove marine growth, loose paint and surface contamination.
Apply a test patch if compatibility remains uncertain, then inspect for coating problems.
Allow the prepared surface to dry before painting. Damp antifouling can trap moisture and contribute to coating failure. Follow the product’s recoat window, because painting too early or too late can impair adhesion.
Hard antifoul suits higher-speed vessels travelling at 30 knots or more. The right type still depends on the hull material, use and local conditions. For example, a boat that stays at lower speeds may need a different coating approach. Check suitability against the vessel’s intended speed and the product’s stated use.
In New Zealand, contain sanding dust, paint debris and wash water, and follow the marina or haul-out facility’s disposal process. Keep residues out of stormwater drains, soil and the sea. Facility procedures guide their safe collection and disposal.
Sanding or removing antifouling can release toxic dust and paint particles. Wear a respirator, control dust and collect debris rather than letting it spread or wash away.
2. Paint buildup and hull performance
Each antifouling recoat can add another layer to the hull. Over time, accumulated paint can leave a rough, uneven surface instead of a clean profile. Multiple layers can reduce hull speed and fuel efficiency, particularly when paint builds up around chines, keel edges and other transitions. Inspect these areas at each haul-out, not just the broad hull panels.
Start by looking for thick ridges, flaking edges and uneven patches. These signs show where old coatings have accumulated or started to fail. A fresh coat won’t level a heavily built-up surface. It may add more thickness instead. If the hull feels rough or shows several distinct paint layers, assess how much coating needs removing before recoating.
Hull material matters too. Fibreglass, aluminium and timber don’t all suit the same antifouling approach. The substrate affects which products can be applied and what preparation is needed. Identify the hull material first, then match the antifoul to it. For example, don’t choose a coating just because it worked on another boat with a different hull construction.
Vessel speed and use also guide the choice. Soft antifoul suits sailboats and powerboats travelling at speeds up to 30 knots, although some products are rated for higher speeds. Soft coatings need semi-regular use: movement helps polish the paint and expose a fresh biocide film. Self-polishing copolymer antifoul releases biocide as its binder dissolves, so it doesn’t rely on water flow to polish.
Hard antifoul can be scrubbed or burnished to create a smoother surface with minimal drag. It suits higher-speed vessels travelling at 30 knots or more. Consider the boat’s typical speed, time afloat and local conditions together. A boat that moves regularly may suit a different coating from one that sits unused for long periods.
Use these checks to assess whether paint buildup is affecting your hull:
Compare the hull surface across panels, keel edges and chines.
Look for ridges, rough patches, peeling edges and visibly thick layers.
Consider hull material, typical speed, local conditions and how often the boat runs.
Choose a coating suited to the hull and intended use, not just the previous paint.
Don’t automatically cover heavy buildup. Removing excess coating can restore a more even surface, while a sound, thinner base may need less intervention. How much to remove depends on the paint’s condition and the hull beneath it.
If buildup makes the next step unclear, a hull antifouling assessment can help you plan the preparation before recoating.
3. Whether to apply primer before antifoul
Primer isn’t an automatic extra coat between old antifouling and new paint. Start by inspecting the hull after cleaning. If the existing coating remains intact, follow the new antifoul manufacturer’s preparation instructions. Adding primer without a specified need can create another layer without solving the real issue: adhesion between the coatings.
Primer matters where existing antifouling primer has worn through or been damaged. These exposed patches need suitable preparation and priming before antifoul goes on. Treat each bare area rather than painting over it as though the surrounding paint provides protection. Check the product datasheet for the correct primer and preparation steps for that hull material.
A sealer coat has a different role. It can address compatibility concerns when the old antifoul and replacement coating may not work together directly. The right sealer depends on the paint system, not simply the hull’s appearance. Follow the datasheets for both coatings, as the specified products and application sequence matter.
A tie-coat is another distinct layer. It may be needed when applying hard antifouling over ablative antifouling, helping prevent a reaction between the coatings. Don’t treat primer, sealer and tie-coat as interchangeable terms. Each has a separate purpose, and substituting one for another can leave the coating system unsuitable.
Use this practical sequence before deciding:
Clean the hull and inspect for bare, damaged or worn-through areas.
Identify the existing antifoul and the proposed replacement product.
Read the manufacturer’s datasheet for primer, sealer or tie-coat requirements.
Prepare exposed patches as directed, then apply the specified coating layers.
Observe the stated drying and recoat windows before applying antifoul.
For example, an intact old coating with no exposed primer doesn’t automatically need a full primer layer. A damaged patch does need attention, while switching from hard to ablative antifoul may call for a tie-coat. These are different situations, so assess the coating system across the hull rather than choosing one product for every area.
Keep the product instructions with the boat’s maintenance record. Record the old coating, any primer or tie-coat used, and the new antifoul. That history makes the next compatibility assessment more straightforward. If you can’t identify the existing paint, avoid guessing from colour or texture. Use a compatible system specified by the new antifoul manufacturer.
Primer supports the coating system only when it suits the surface and the products above it. Match each layer to the exposed hull or existing paint, and follow the specified preparation sequence.
4. Application tools and coat thickness
Antifouling works best when applied evenly at the thickness specified by its manufacturer. Multiple thin coats generally perform better than one thick coat. A heavy, uneven application can dry poorly and leave inconsistent coverage. Read the product label before opening the tin, then follow the stated application method and coverage guidance.
A roller can cover broad, accessible hull areas efficiently, whilst a brush helps reach corners, edges and fittings. Choose tools that suit the paint and hull shape. Stir the antifoul thoroughly before use, following its instructions, because the active ingredients can settle. Keep stirring as you work so the coating stays consistent across the hull.
Pay particular attention to high-wash areas, where water movement and turbulence place greater demands on the coating. These can include the bow, waterline, keel and leading edges. One commonly used approach is to apply one stripe coat over these zones, followed by two coats across the complete surface. Treat this as a practical example, not a substitute for the product’s instructions.
Work methodically from one hull section to the next. Keep a wet edge where possible, so adjacent passes meet without missed strips or thick ridges. Check the finish in good light before moving on. If the roller leaves dry gaps around a fitting, use a brush to cover that area rather than loading the whole hull with extra paint.
Use this application sequence:
Stir the antifoul as directed and keep it mixed during painting.
Apply a stripe coat to high-wash areas if the product system calls for it.
Roll or brush the first thin coat evenly over the hull.
Observe the stated drying time, then apply the next coat within its recoat window.
Inspect edges, fittings and the waterline for missed areas before finishing.
Coat timing matters as much as coverage. Applying another coat too soon or too late can impair adhesion. Temperature, ventilation and paint formulation affect drying, so use the product’s specified recoat window rather than relying on touch alone. Keep the hull dry during preparation and application. Damp old antifoul can trap moisture beneath fresh paint.
Record the product name, application date and number of coats in the boat’s maintenance notes. This gives you a useful reference at the next haul-out, especially if the antifoul type changes. A clear record also helps distinguish normal wear from patchy coverage, so the next preparation can focus on areas that need attention.
5. Assessing the condition of old antifouling paint
Before recoating, inspect the hull in good light and judge the paint by its condition, not its colour. A sound coating stays attached when you examine its edges. Peeling, blistering, softness and heavy chalking point to different problems. Mark affected patches so you can distinguish isolated damage from widespread failure.
Start with adhesion. Look for lifted edges, flakes or areas separating from the layer beneath. Peeling paint can keep lifting and take the new coat with it. Remove loose material rather than coating over it. If the remaining antifoul is firmly attached, prepare the surface according to the replacement paint’s instructions.
Next, check for blistering and soft spots. These can signal moisture intrusion or a deeper hull issue, rather than simple paint failure. Don’t treat a blister as an ordinary scuff. Inspect the surrounding area and assess the underlying surface before deciding how to prepare it. A coating problem that extends below the paint needs more than another coat.
Run a clean hand or cloth over the dry surface to assess chalking. A slight surface residue differs from excessive chalking, which can indicate that the paint binder has broken down. A degraded binder may not hold new antifoul well. Remove unstable or oxidised layers as needed, then follow the new paint’s specified preparation method.
Use a consistent inspection sequence across the hull:
Check the waterline, keel, chines and leading edges for peeling or worn paint.
Look across broad hull panels for blisters, soft patches and uneven coating.
Assess chalking on the dry surface, especially where the paint looks faded.
Mark damage and compare its spread before choosing between local preparation and wider removal.
One boat owner reported that 99% of the antifouling on a fibreglass hull remained in very good condition and well attached. That example shows why assessment matters: a small damaged area doesn’t automatically mean every sound section needs stripping. By contrast, widespread peeling or chalking changes the preparation required.
Where the old coating is well adhered but its last two coats are oxidised, sanding those two coats can leave a more suitable base. Remove dust and loose residue before painting, and keep the surface dry. The replacement antifoul’s datasheet should guide preparation and compatibility for the remaining paint.
Record the hull’s condition and the areas prepared before repainting. For a professional antifouling assessment and repaint, arrange the work around what the hull inspection reveals.
Boat Valet Auckland: Boat Cut and Polish
Boat Valet Auckland provides antifouling for owners whose hull inspection shows it’s time to prepare and recoat. If the old paint is peeling, heavily chalked or building up unevenly, professional preparation can address the surface before fresh antifoul is applied. The right approach depends on the coating’s condition, hull material and new paint system.
Boat Cut and Polish is a separate option for improving the boat’s exterior finish, whilst Teak Restoration and Interior Valet address other areas of onboard care. Choose the service that matches the work your boat needs, rather than treating cosmetic finishing as a substitute for antifouling.
Contact Boat Valet Auckland to discuss antifouling for your boat.
Plan your next hull-care step
Make the next haul-out more than a date in the diary. Use it to set a practical maintenance plan, record the coating system applied and note areas to review before the following season. Keep those details with the boat’s maintenance records. They’ll give you a clearer starting point next time, especially if ownership changes or the hull’s condition shifts.
If you’re still deciding whether you can paint antifoul over old paint, let the surface condition and preparation requirements guide your next move. For other upkeep, Boat Valet Auckland also offers Boat Cut and Polish and Teak Restoration. Keep cosmetic finishing distinct from antifouling, and organise the work around your boat’s needs.
Choose a next step that fits your vessel and maintenance schedule. Contact Boat Valet Auckland to discuss your antifouling needs, and move forward with a considered plan for your boat.
Frequently Asked Questions
Can You Paint Over Old Boat Antifouling?
Yes, you can paint antifoul over old paint when the existing coating is sound and the new product is compatible. For example, a firmly attached coating may only need the preparation specified for the replacement antifoul. Don’t judge it by age or colour alone. Check the maintenance record or product label, and compare the old and new paint instructions before starting.
Can you apply new antifouling paint over old antifouling paint?
Yes, if the old antifouling is firmly attached and compatible with the new coating. The new paint’s datasheet sets out the preparation and any required intermediate coating. If you know the product identities, compare their compatibility guidance before starting work. Keep the paint tins or maintenance notes for future recoating, so the next application can be matched to the coating already on the hull.
How do you tell whether old antifouling paint is compatible with a new product?
Identify both products, then check the new antifoul manufacturer’s compatibility chart or datasheet for the existing coating type. Check the binder type as well as whether the paint is hard or ablative, because these details affect which coatings can be combined. If you can’t identify the old product, use the new manufacturer’s stated preparation system and apply a small test patch before coating the hull.
Which antifouling paints require a primer or barrier coat over old paint?
Primer is generally needed where existing primer has worn through or been damaged, rather than automatically across intact antifouling. A barrier coat serves a different purpose: it is applied over bare fibreglass to help prevent blisters. Follow the coating manufacturer’s instructions for the particular hull and paint system. Don’t substitute a barrier coat for primer or tie-coat unless the product instructions specify it.
How should you prepare and clean old antifouling paint before repainting?
Remove marine growth and loose paint, then clear away dust and contamination before recoating. Pressure washing can remove growth and loose antifouling, although soft coatings may come away more readily than hard paint. Let the hull dry fully before painting, and follow the new product’s preparation instructions. If sanding is required, control the dust and wear a respirator because antifouling dust is toxic.
What should you do if old antifouling paint is flaking, damaged, or unknown?
Don’t coat over flaking edges or damaged patches. Remove loose paint and inspect the surface beneath. Blisters or soft spots may point to moisture or deeper damage. If the product is unknown, don’t infer its type from colour. Follow the replacement paint manufacturer’s guidance for an unidentified coating, and test a small prepared area for visible problems before proceeding across the hull.
Can you paint hard antifouling over ablative antifouling, or vice versa?
Ablative antifouling can be applied over properly prepared hard antifouling. For hard antifoul over ablative paint, a tie-coat may be needed to prevent a reaction between the coatings. These combinations aren’t interchangeable, so check the specific paint datasheets before choosing the coating system. Preparation matters too: remove loose material and apply any required tie-coat as directed before the final antifoul.
Comments